
How to Frame a Puzzle Without Warping It: Glue, Backing Sheets, and Wall Decor Decisions
Most people search how to frame a puzzle after the puzzle is already finished. That is understandable, but it is also where many framing problems begin.
A finished puzzle is not a poster. It is still a loose paperboard structure, even when it looks flat on the table. The joints are held by the cut shape and surface pressure. Once glue, backing film, foam board, or a tight frame enters the process, small problems stop being temporary. Dust becomes sealed under the coating. Fingerprints turn into dull marks. A raised edge may dry that way. If the frame is too tight, the puzzle may look fine on day one but start lifting along the surface later.
For a home user, that usually means rework — or accepting a framed puzzle with flaws that are now impossible to hide. For brands selling collectible puzzles or jigsaw puzzle wall decor, the problem is more direct: the product may look premium in the box but lose that impression once it is mounted on the wall.
The right question is not “Should I glue it?” The better question is: how will this puzzle be displayed after it is finished? That decision should come before glue.
Start With the Display Method, Not the Adhesive
Glue appears too early in many DIY instructions. It feels like the obvious answer, but it is not always the correct first step.
Before choosing glue, first check how the puzzle will be displayed. A puzzle going into a frame does not need the same treatment as one shown open-face on a wall. If the artwork surface should stay clean, avoid front-side glue unless it has been tested. Dark artwork, photo puzzles, and matte finishes can show glue marks more easily. On those puzzles, backing sheets are usually safer.
For glass or acrylic framing, back mounting is often enough. The frame and backing board already give the puzzle structure. For open-face display, glue gives stronger surface locking, but it also makes surface mistakes permanent.
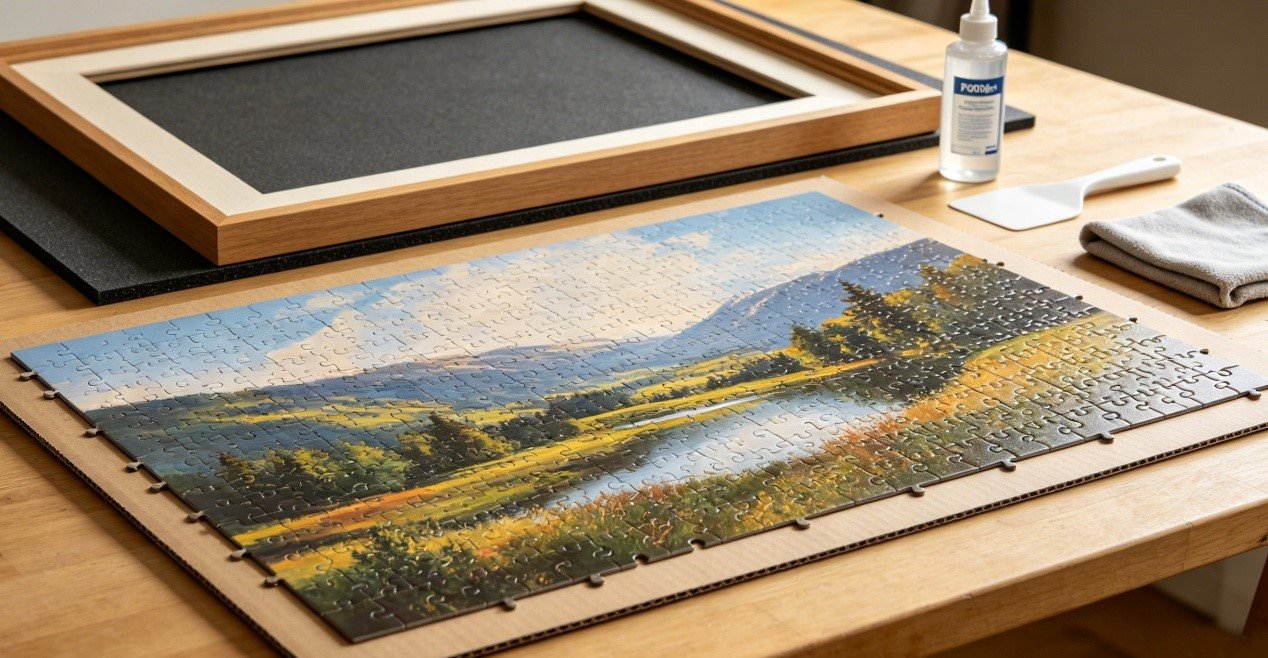
Only after that should you choose puzzle glue or backing sheets. Measure the assembled puzzle before buying the frame. The size printed on the box is only a reference. A few millimeters of difference is enough to make a tight frame cause edge lift, buckling, or pressure marks.
Confirm Display Method → Check Surface Compatibility → Choose Glue or Back Mount → Measure Real Size → Select Frame After Dry & Flat
If you glue first and later discover the puzzle is slightly larger than expected, the options are bad: trim it, force it, or buy a custom frame. None of those should be the plan.
Clean the Puzzle Before You Lock Anything In
Dust and fingerprints are small problems only until adhesive touches them. After that, they become part of the finished surface.
Move the puzzle onto a flat rigid board before cleaning. A soft cloth or table mat lets the pieces move while you wipe, especially around the edges. For a 1000-piece puzzle around 500 × 700 mm, leave at least 30–50 mm of working space around the puzzle; otherwise, your hand or cloth will keep catching the edge pieces.
Do not start with a wet cloth. Moisture can soften the printed layer or push dirt into the piece joints. Use a simple cleaning sequence:
Avoid alcohol wipes unless the surface has been tested. Some puzzle coatings tolerate them; some turn patchy. Matte surfaces, textured coating, and lower-cost printed finishes are more sensitive than they look.
💡 Pro Tip
A practical factory-side rule: if the puzzle already looks dusty under side light, glue will not improve it. It will preserve the problem. Use a desk lamp or phone flashlight from a low angle. Side light shows raised edges, dust, fingerprints, and small gaps much better than ceiling light.
Puzzle Glue vs Backing Sheets: They Are Not the Same Decision
People often search for the best puzzle glue, but that question is too broad. The best option depends on the display method. Puzzle glue and double-sided backing sheets solve different problems.
When Puzzle Glue Makes Sense
Puzzle glue works from the front. It flows across the joints and creates a surface film. This is useful when the puzzle needs to behave like one sheet, especially for open-face display, craft mounting, or handling before framing.
But glue changes the surface. That is the part many instructions do not say clearly enough. Too much glue can cause curl. Cheap glue can leave streaks. Thick glue may pool in the joints and dry cloudy. On dark images, maps, night scenes, or photo puzzles, uneven glue marks are easier to see.
For most paperboard puzzles, a clear-drying, water-based puzzle glue with medium viscosity is safer than a thick craft glue. The strongest glue is not automatically the best puzzle glue. If it spreads badly, dries unevenly, or stays tacky too long, it creates more risk.
For a 1000-piece puzzle around 500 × 700 mm, many users may use roughly 120–180 ml of glue, depending on surface absorbency and coat thickness. This is a working range, not a fixed rule. Textured surfaces may take more. Gloss-coated puzzles may need less.
When Backing Sheets Are the Better Choice
Double-sided adhesive backing sheets work from the back. They are cleaner when the front artwork should stay untouched. This is usually better for photo-style puzzles, museum images, licensed artwork, and decor-led puzzles where surface appearance matters more than tactile sealing. If the puzzle will sit behind glass or acrylic, the front does not always need glue.
The weak point is alignment. Once the adhesive sheet touches the puzzle, repositioning is difficult. If the puzzle shifts, the backing can wrinkle or pull joints out of place. For larger puzzles, do not apply one large adhesive sheet in one movement unless two people are working together. Segmented backing sheets are easier to control. Apply from one side, peel the liner slowly, and press as you go.
The Decision Is Not Neutral
How to Apply Puzzle Glue Without Bubbles
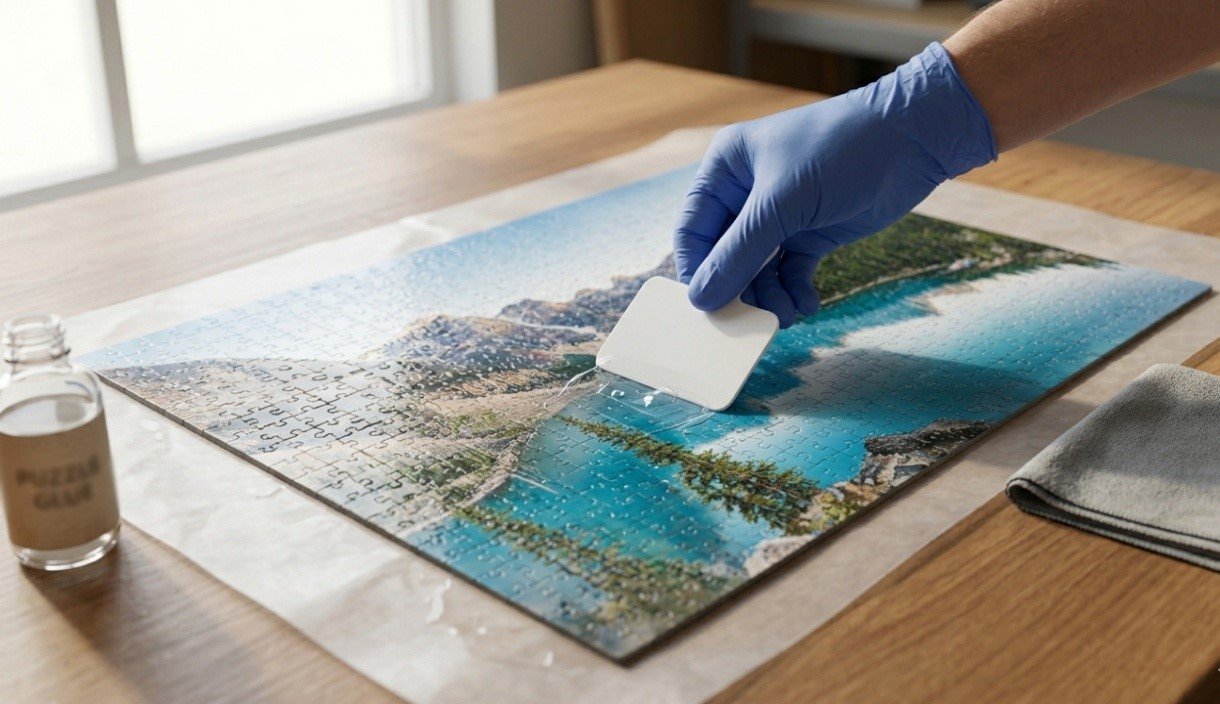
Apply glue from the center and work outward toward the edges. Use a clean plastic spreader and keep the layer thin. Work quickly. If the glue starts to set in the center before the edges are covered, uneven tension can form across the surface. That is what causes later warping.
Bubbles need to be handled while the glue is still wet. Once the surface starts to dry, pushing them out usually leaves marks. Use a clean plastic card or spreader and move the bubble toward the nearest edge. If one piece corner lifts, press it down flat. Do not rub back and forth; the printed surface is easier to damage than it looks.
Do not try to solve everything with one thick coat. A heavy glue layer is one of the common reasons puzzles curl after drying, especially on thinner board. Apply a thin coat first, let it dry flat, then decide whether a second light coat is really needed. For darker artwork or matte surfaces, be more cautious. Extra glue can make the surface look uneven even if the puzzle is technically fixed.
💡 Pro Tip
Drying time depends on glue type, room temperature, humidity, and coat thickness. Many puzzle glues need several hours before handling and longer before framing. Overnight drying is safer than rushing it after one or two hours. Do not dry the puzzle under direct sun. Fast uneven drying can make curling worse. Flat, shaded, room-temperature drying is boring, but it works.
Back-Mounting Without Front Glue
If you want the front surface to stay clean, mount from the back.
The difficult part is flipping the puzzle. For a 500 × 700 mm puzzle, use two rigid boards. Place one board under the puzzle and one board on top. Hold both boards firmly, then flip the whole sandwich. Do not lift the puzzle from one corner. That is how sections break.
Once the puzzle is face down, apply double-sided backing sheets in strips. Start from one edge and move across slowly. Peel only part of the release liner at a time. Press with a soft cloth or squeegee as you go. Do not stretch adhesive sheets. Stretching creates tension, and tension can show up later as curling or edge lift.
For larger puzzles, a full backing board is often better than adhesive film alone. Foam board, greyboard, or thin MDF can be used depending on frame depth and hanging method.
Measure the Finished Puzzle Before Buying a Frame
Do not rely only on the size printed on the box. The finished puzzle may shift slightly after assembly, glue, humidity, or backing. Measure the puzzle after it is flat and dry.
Measure three places:
Use the largest width and height as the working size. If the puzzle is 499 mm at the top and 502 mm at the bottom, do not buy a 500 mm internal frame and hope it fits. It may buckle.
For small and medium puzzles, allow roughly 2–4 mm extra inside the frame opening. For larger puzzles, especially 1000-piece and 1500-piece formats, more tolerance may be needed depending on backing thickness and frame structure.
Frame depth also matters. A glued puzzle mounted on backing board is thicker than a poster. If you add foam board, mat board, glass, and the puzzle itself, a shallow photo frame may not close properly. This is where many DIY framing attempts fail. The frame looks correct from the front, but the back cannot lock cleanly. Then people force the clips, bend the backing, and create pressure marks. That is not a frame problem. It is a measurement problem.
Choose the Frame by Surface, Not Just Color
Most frame advice talks about color matching. That is only part of the decision. For puzzles, the frame should match artwork density, surface reflectivity, and room style.
Busy artwork usually works better with a thin black, white, walnut, or neutral frame. The puzzle already has enough visual detail. Large soft areas, such as sky, water, maps, or vintage illustration backgrounds, often benefit from a mat board. A 30–50 mm mat border gives the artwork breathing room and hides small edge irregularities.
For glossy puzzles, glass can create glare. Acrylic is lighter and safer for larger frames, but it scratches more easily. Standard glass is clearer and harder, but heavier. For large jigsaw puzzle wall decor, frame weight is not a small detail. A heavy frame on weak wall hooks is a future complaint.
A practical frame direction:
If the puzzle will be sold as a decor item, do not leave the frame logic entirely to the customer. Give a recommended finished frame size, frame depth, and hanging method in the product guide. That small instruction reduces after-sale confusion.
Using Multiple Puzzles as Wall Décor
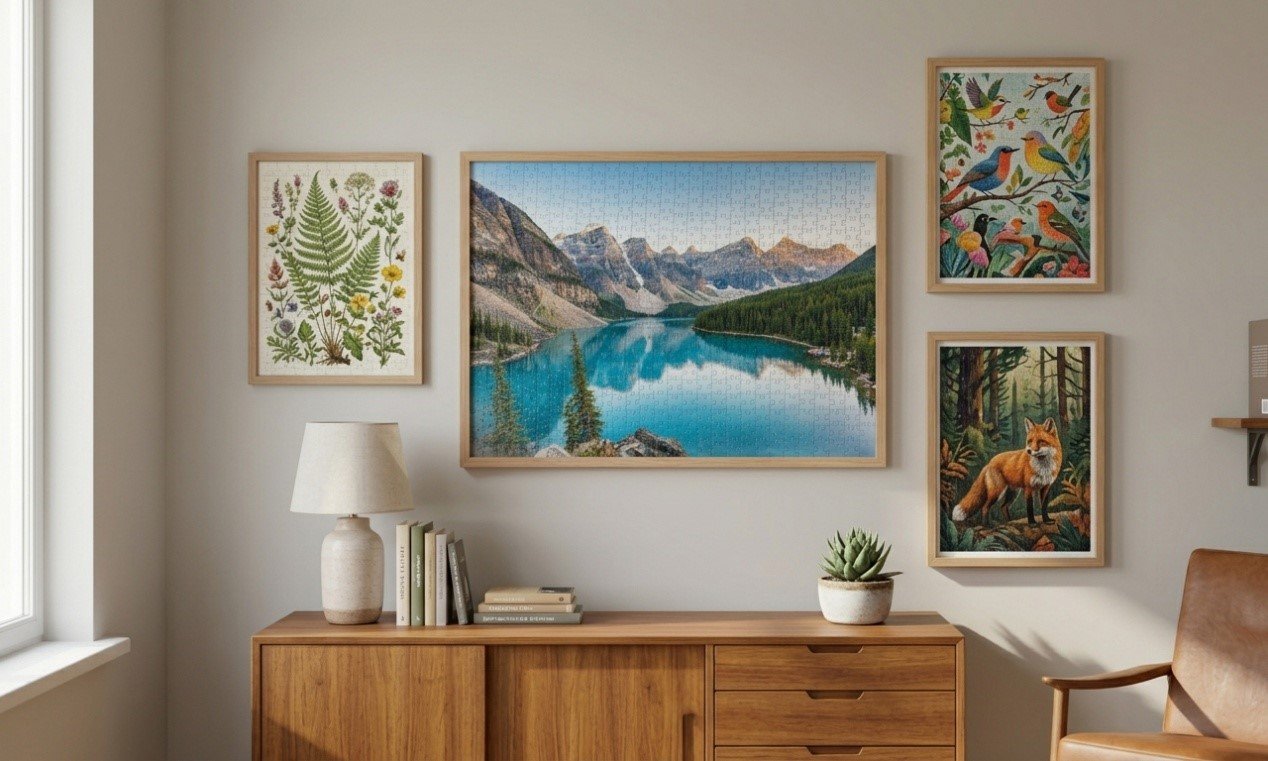
A single framed puzzle can work, but multiple puzzles can create a stronger wall system if the layout is planned.
The common mistake is spacing everything evenly without considering image weight. Puzzles are usually more visually dense than posters. If six busy puzzle images are hung too close together, the wall becomes noisy.
Start with the largest puzzle first. Treat it as the anchor. Then place smaller puzzles around it. For a clean photo wall, keep spacing between frames around 50–80 mm. Narrower spacing can work for small frames, but large puzzle frames need more air. If the images are colorful, use consistent frame color to control the wall.
Useful layout models include a three-piece horizontal row, a 2 × 2 grid, a large center puzzle with smaller puzzles beside it, or a vertical stack for narrow walls and stair areas.
For brands planning a puzzle series, this matters even more. If every SKU has a different finished size, customers cannot easily build a wall set. That hurts repeat purchase logic. A puzzle series designed for wall decor should use controlled finished sizes: for example, all 500-piece puzzles in one size family and all 1000-piece puzzles in another. This is a display-stage constraint, not only a packaging decision.
For Puzzle Brands: Add Framing Logic Before Production
A puzzle sold only for play has one set of requirements. A puzzle sold as jigsaw puzzle wall decor has another. Before production, decide:
Frame-ready size is especially important. A beautiful puzzle that finishes at an awkward size may force customers into custom framing. That raises the real ownership cost. For decor-led products, that can hurt conversion.
If the target market commonly uses 50 × 70 cm frames, it is usually smarter to design around that frame logic early instead of creating a custom finished size that becomes harder to display.
Manufacturing cost is not the only cost. Customer friction is also a cost.
A Warning, Not a Soft Ending
If the puzzle surface is dusty, oily, or already lifting at the edges, do not start with glue. Clean and flatten first. Glue does not hide poor surface condition; it locks it in.
If the puzzle will be framed behind glass or acrylic, front glue may be unnecessary and may slightly change the surface appearance. Backing sheets are often cleaner for that use case.
⚠️ Warning: If your product is a low-cost promotional puzzle, do not write the instruction copy like a collector-grade wall decor product. The finishing method should match the product level. Selling “frame-ready” language without controlling size, surface, and mounting logic is how a simple puzzle becomes an after-sale complaint.